General
Input:
Mode:
Robot.run() threads:
Robot
General
Once Python has been initialized (when the Console outputs 'Python initialization complete'), the simulator is ready for use.
You can copy/paste code into 'Code' tab or type in your code there directly. Be sure to upload your code using the 'Upload Code' button. When your code has been uploaded, the console will output 'Code upload successful'. Now everything is ready for simulation!
You can start and stop simulations by clicking the buttons to the right of the field.
If you're having trouble getting started, a code sample is available
here.
The Robot API is linked in the nav bar of this page. If you would like to make parallel calls to Robot.run(),
make sure to adjust the number of available threads in the Settings tab.
| Icon | Action |
|---|---|
| Starts Teleop Mode | |
| Starts Autonomous Mode | |
| Stops Simulation |
Field
The field consists of walls, ramps, interactable objects, and tape lines (to be used with line followers). The field description also defines the starting position of the robot. You can update the field by uploading your own code in the Field tab and pressing the 'Upload Field' button.
Walls:
Walls are listed under the key wallsData and consist of 4 key-value pairs,
with keys x, y, w, h. There is a fifth optional key: rotate.
The x and y values represent the top left corner of the wall.
w and h represent the width and height of the line respectively.
The rotate value is the angle the wall will be rotated counterclockwise around its top left corner in degrees.
Quarries:
Quarries are listed under the key quarryData and consist of 5 key-value pairs, with keys x, y,
w, h, orientation. The x and y values represent the top left corner
of the quarry. w and h represent the width and height of the quarry. orientation represents
the side of the quarry that you can pick up objects from; this side of the quarry is drawn with a dashed line. Use Robot.pick_up()
at the open side of the quarry to pick up a random stone or ore.
Campsites:
Campsites are listed under the key campsitesData and consist of 2 key-value pairs, with keys x, y.
The x and y values represent the top left corner of the campsite. To spin the campsite satellite dish, get close
to the campsite and use Robot.spin_dish(). To get the value of the satellite dish, get close to the campsite and use Robot.spin_val().
Refineries:
Refineries are listed under the key refineriesData and consist of 3 key-value pairs, with keys x, y,
highSide. The highSide key represents the side of the refinery you can put objects in. The x and y
values represent the top left corner of the refinery. To put a stone or ore into the refinery, get close to the highSide of the
refinery and use Robot.refine().
Receivers:
Receivers are listed under the key receiversData and consist of 7 key-value pairs, with keys x, y, w,
h, color, buttonColor, buttonLocation. The x and y values represent the top
left corner of the receiver. w and h represent the width and height of the receiver. buttonLocation represents
the direction the button on the receiver is facing.
Ramps:
Ramps are listed under the key rampsData and consist of 6 key-value pairs,
with keys x, y, w, h, highSide, incline.
The x and y values represent the top left corner of the ramp.
w and h represent the width and height of the rectangle that represents the ramp. The value for
highSide should be one of the strings "up", "down", "right", or "left". highSide represents
the side of the rectangle that represents the higher end of ramp; this side of the ramp is drawn with a dashed line, and the
opposite side isn't draw at all. The incline value is the angle of elevation of the ramp in degrees.
The arrows on the ramp represent the direction of the force acting on your robot if your robot is on the ramp.
Interactable Objects:
Interactable objects are listed under the key interactableData. Depending on the key shape, they can
form different shapes:
-
rectangle: 4 key-value pairs, with keysx,y,w,h. Thexandyvalues represent the top left corner of the rectangle. -
circle: 3 key-value pairs, with keysx,y,r. Thexandyvalues represent the center of the circle.
Note: Walls and rectangular interactable objects can only be oriented perpendicular to the field.
Tape Lines:
Tape lines are listed under the key tapeLinesData and consist of 4 key-value pairs,
with keys x1, y1, x2, and y2.
The x1 and y1 coordinates correspond to one end, while the x2, y2 coordinates
correspond to the opposite end of the line.
Starting Position:
The robot's starting position is defined under the key startPosition and consists of 3
key-value pairs, with keys x, y, and dir. The x and y
values represent the starting coordinates of the center of the robot, where the top left corner of the field is (0, 0) and
the bottom right corner is (144, 144).
The dir value represents the direction the robot should initially face; possible values are the strings "up",
"down", "right", or "left".
Unlike with other field objects, it is an error to list multiple starting positions. The starting position must be defined exactly once.
The field description follows the format of a JSON object. For more information, you can look through the documentation of the JSON object format here.
You can change the color of objects by adding a string like
"blue" or "gold" as the value of the color key for any type object.
For an example field description, view the default configuration in the Field tab below.
Robot Stats
| Kart | Speed | Acceleration | Handling |
|---|---|---|---|
| Swift | 0.75 | 1.25 | 1.25 |
| Spry | 1 | 1 | 0.75 |
| Sturdy | 1.25 | 0.75 | 1.25 |
Keyboard
There are two different ways you can configure your robot's controls with your keyboard.
Using the Keyboard Class, you can customize which keyboard inputs control your robot's motors. For more information about which keys are supported and how to use this class in your code, visit the Keyboard Class section of the Robot API.
Using the Gamepad Class, WASD and the arrow keys correspond to what would be the left and right joysticks on a gamepad, respectively. (Note: These controls are not available when driving a real robot. They are for ease of use when porting gamepad-based code to the simulator.) In addition, these controls correspond to specific input names that you can reference in your code:
Gamepad Class Controls
| Keyboard Inputs | Gamepad | Robot API |
|---|---|---|
| A/D | Left Joystick Left/Right | joystick_left_x |
| W/S | Left Joystick Up/Down | joystick_left_y |
| Left/Right Arrow | Right Joystick Left/Right | joystick_right_x |
| Up/Down Arrow | Right Joystick Up/Down | joystick_right_y |
For more information about accessing these values in your code, you can visit the Gamepad Class section of the Robot API.
Gamepad
When using the Gamepad class, keyboard inputs only support joystick controls. For more functionality, a game controller can be connected to the simulator. To input a game controller, connect it to your computer and click any button. Confirm that the controller has successfully been connected by checking the 'Gamepad' tab below. The following are button mappings between a generic game controller and the Robot API:
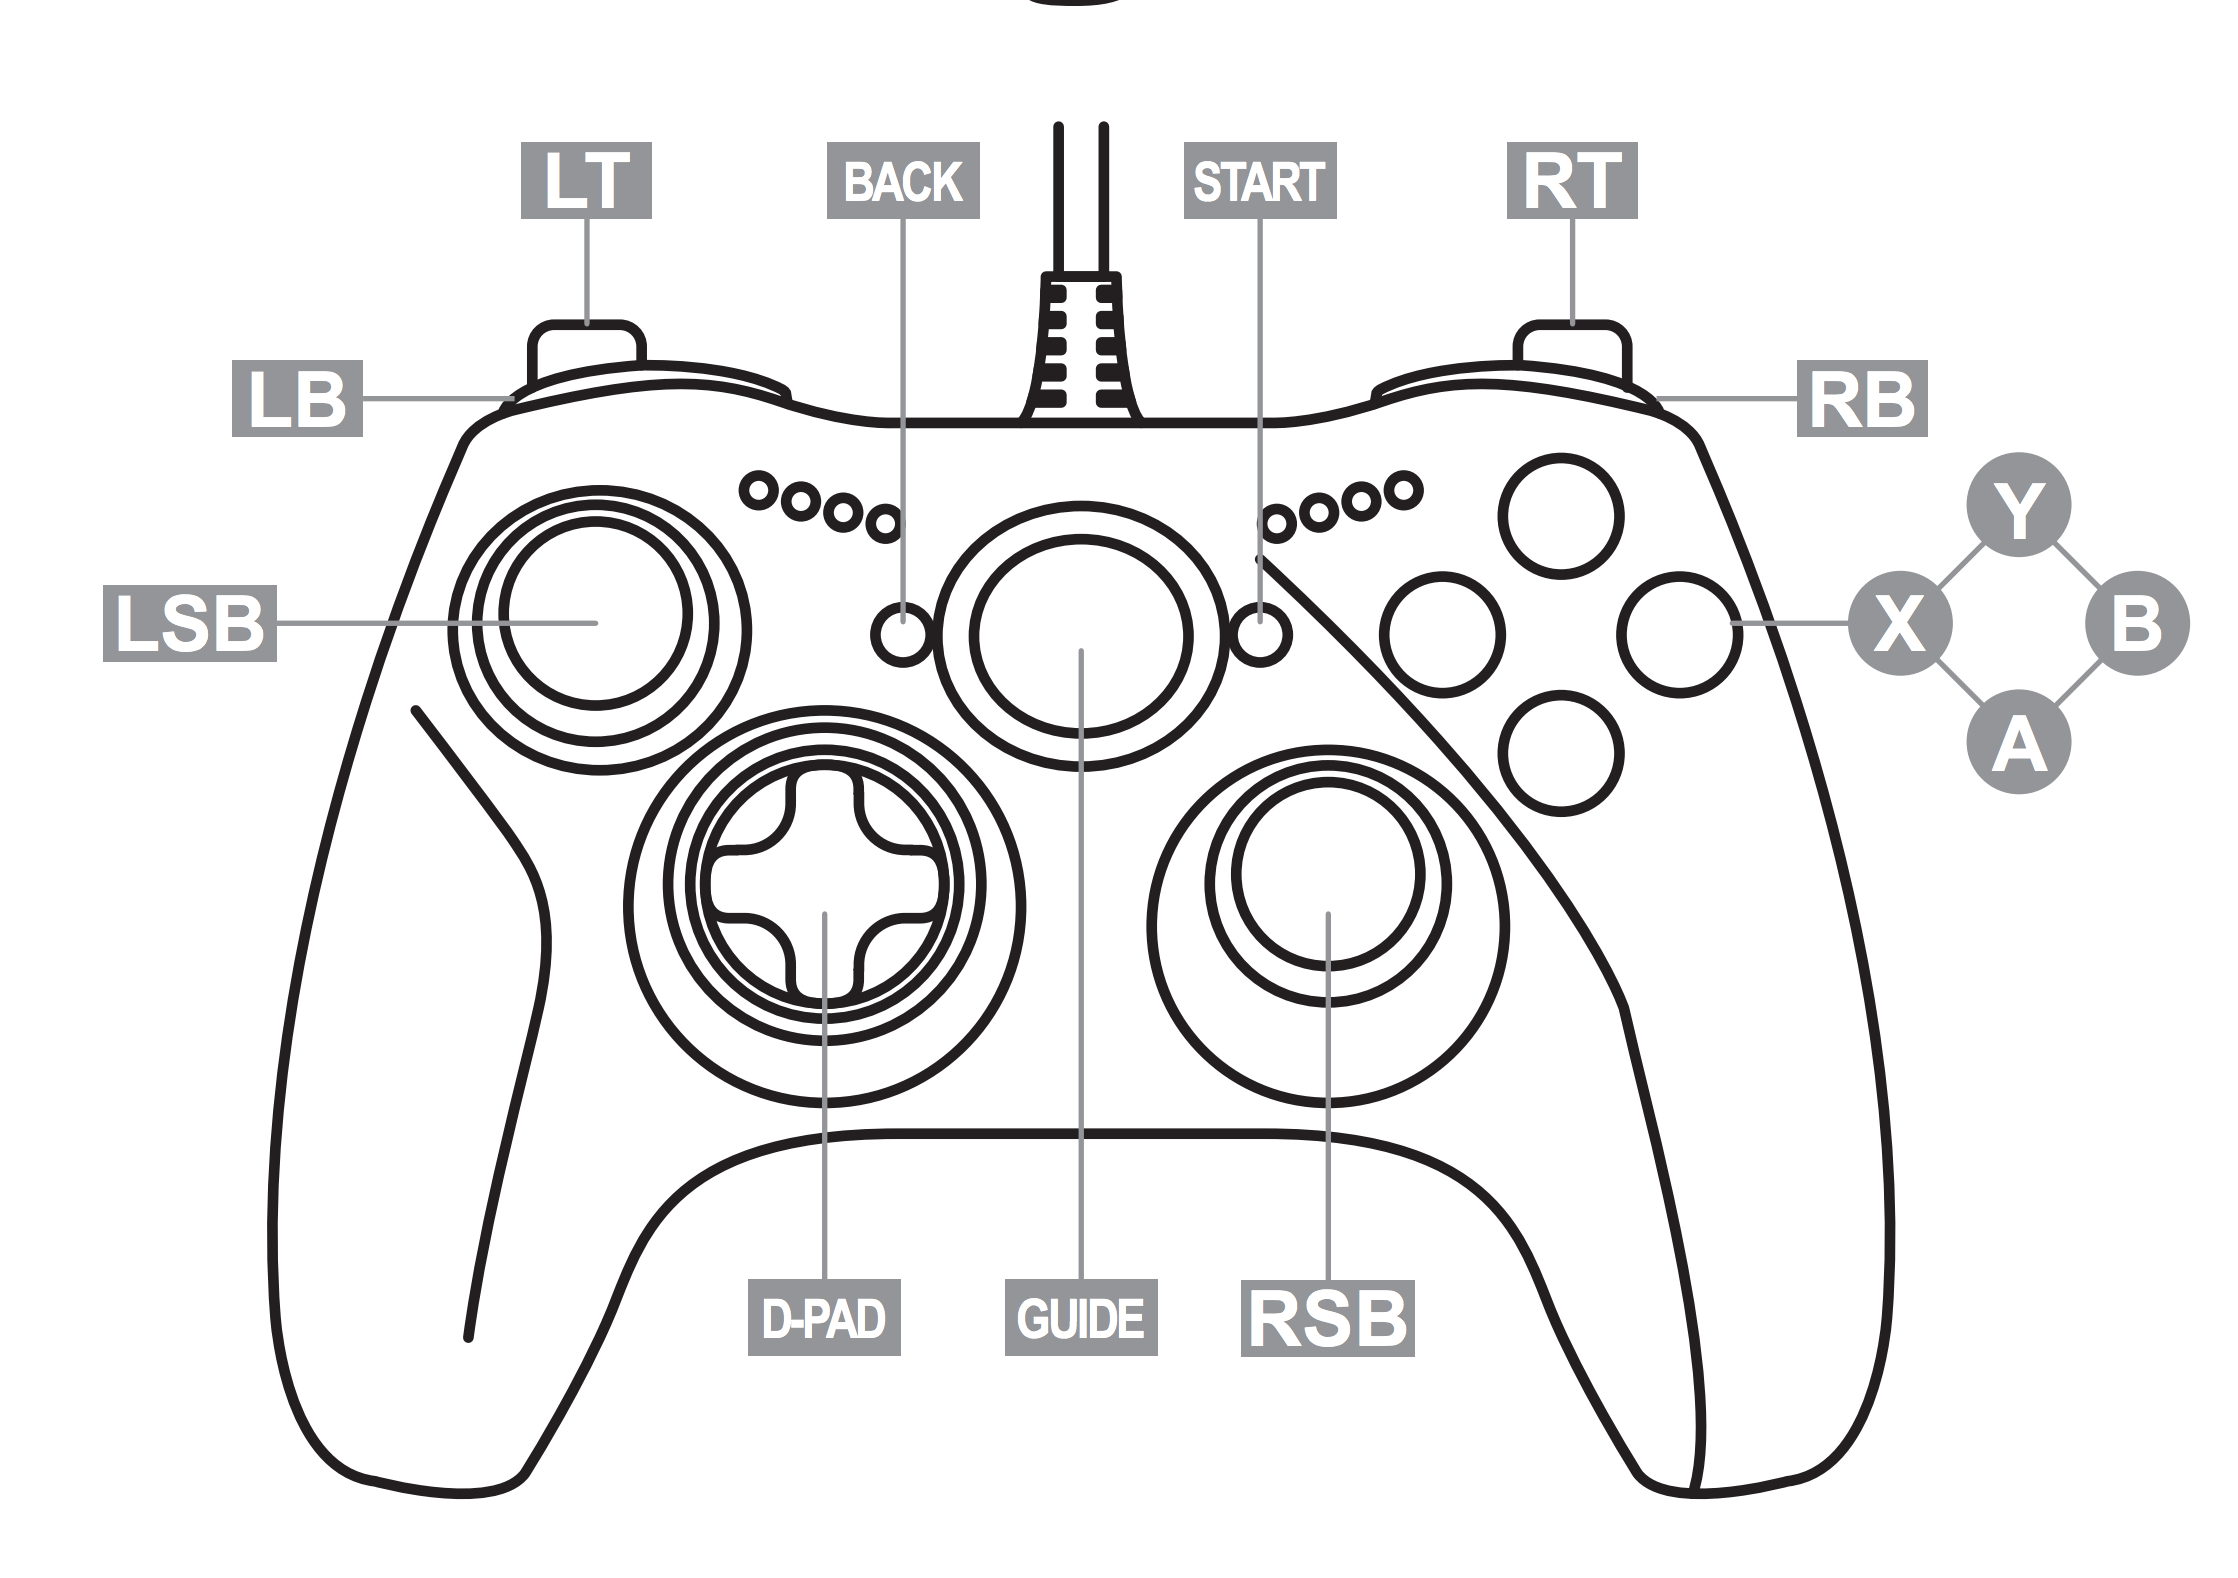
| Game Controller | Robot API |
|---|---|
| A | button_a |
| B | button_b |
| X | button_x |
| Y | button_y |
| LB | l_bumper |
| RB | r_bumper |
| LT | l_trigger |
| RT | r_trigger |
| Back | button_back |
| Start | button_start |
| LSB (Pressed) | l_stick |
| RSB (Pressed) | r_stick |
| D-pad Up | dpad_up |
| D-pad Down | dpad_down |
| D-pad Left | dpad_left |
| D-pad Right | dpad_right |
| Axis 0 / LSB (Left & Right) | joystick_left_x |
| Axis 1 / LSB (Up & Down) | joystick_left_y |
| Axis 2 / RSB (Left & Right) | joystick_right_x |
| Axis 3 / RSB (Up & Down) | joystick_right_y |
Actuators
Motor Controller (Velocity)
device_id: Pass in "koala_bear"param: Use "velocity_a" to set the velocity of the right motor and "velocity_b" for the left motor.value: Pass in afloatvalue in the range [-1,1], where a larger magnitude corresponds to a higher velocity in either direction.
Sample Usage:
Robot.set_value("koala_bear", "velocity_a", 1)
device_id: Pass in "koala_bear"param: Pass "velocity_a" or "velocity_b" to get the velocity of the right or left motor respectively.
Sample Usage:
Robot.get_value("koala_bear", "velocity_a")
Motor Controller (Invert)
device_id: Pass in "koala_bear"param: Use "invert_a" and "invert_b" to invert the direction of rotation for the left and right motors respectively. Note that due to its orientation, the left motor will send the robot backwards by default.value: Pass in abooleanvalue. True means inverted, False means not inverted.
Sample Usage:
Robot.set_value("koala_bear", "invert_b", True)
device_id: Pass in "koala_bear"param: Pass "invert_a" or "invert_b" to return whether the right or left motor is inverted.
Sample Usage:
Robot.get_value("koala_bear", "invert_b")
Sensors
Limit Switch
device_id: Pass in "limit_switch"param: Pass "switch0" or "switch1" to specify which switch you want the status of where switch0 is the switch on the front of the robot and switch1 is on the back
True indicates that the switch is in contact with a surface and
False indicates that the switch is not in contact with any surface on the field.
Sample Usage: Robot.get_value("limit_switch", "switch0")
Line Follower
device_id: Pass in "line_follower"param: Pass "left", "center", or "right" to specify the sensor you want data from
float value in the range [0,1] inclusive that
describes the amount of light being reflected into the sensor where 1 indicates that the sensor
is directly over a line, and 0 indicates that the line is reasonably far away.
Sample Usage: Robot.get_value("line_follower", "center")
Interactable Objects
(Note: The following API calls are not available when driving a real robot. They are for educational purposes in the simulator only. See the Robot API for info about how to code for the real robot.)
Some objects on the field are interactable. Your robot can pick up, move, and drop these objects.
When you bring the center of your robot's front side close to the object, you can pick it up using Robot.pick_up().
After you pick up an object, you can move your robot around as usual, and your robot will carry the object on the center of its front side.
To drop an object the robot is carrying, use Robot.drop(). After an object is dropped, it will stay in the same place you dropped it, unless you pick it up again.